Vegetable Tortilla Roll Ups are the quintessential answer to the modern quest for a lunch that is as visually stunning as it is nutritionally dense. These aren’t just your standard party appetizers; they are a masterclass in texture, color, and culinary engineering. By utilizing a “moisture barrier” technique, we ensure every bite remains crisp, avoiding the dreaded sogginess often associated with pre-made wraps.
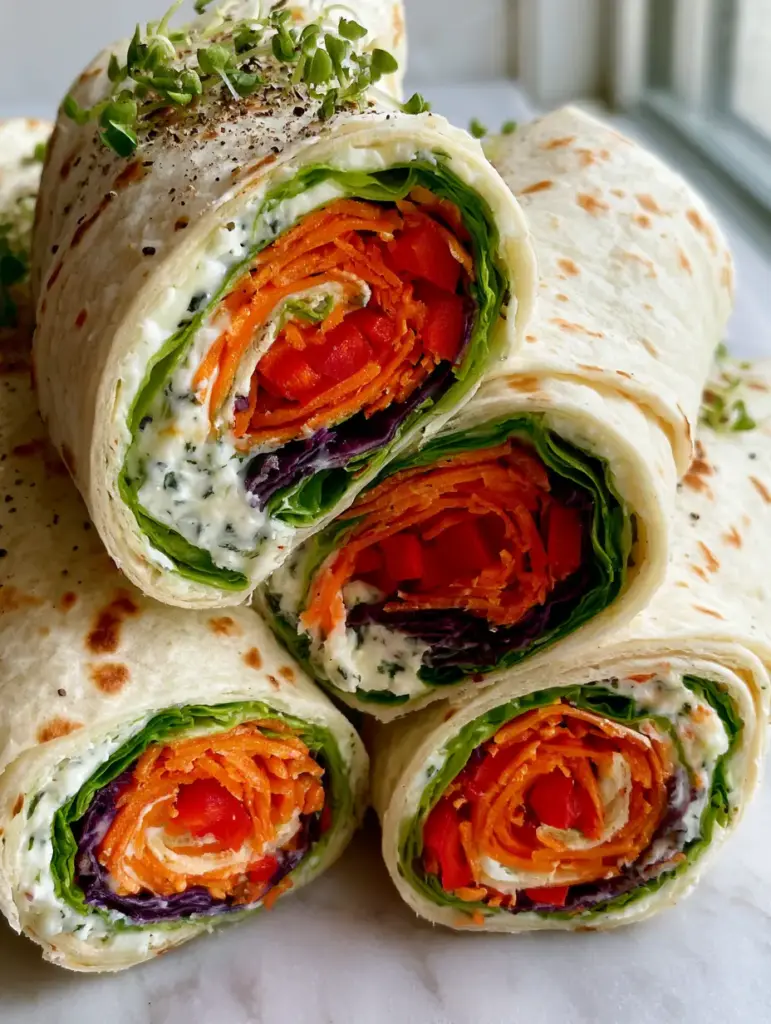
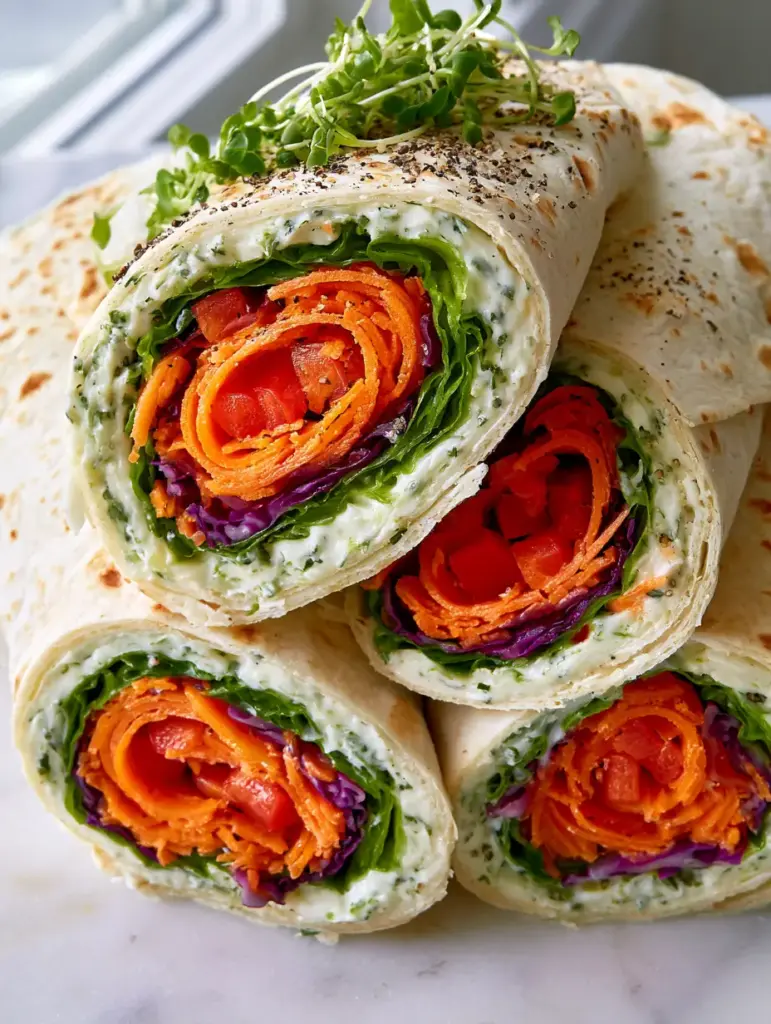
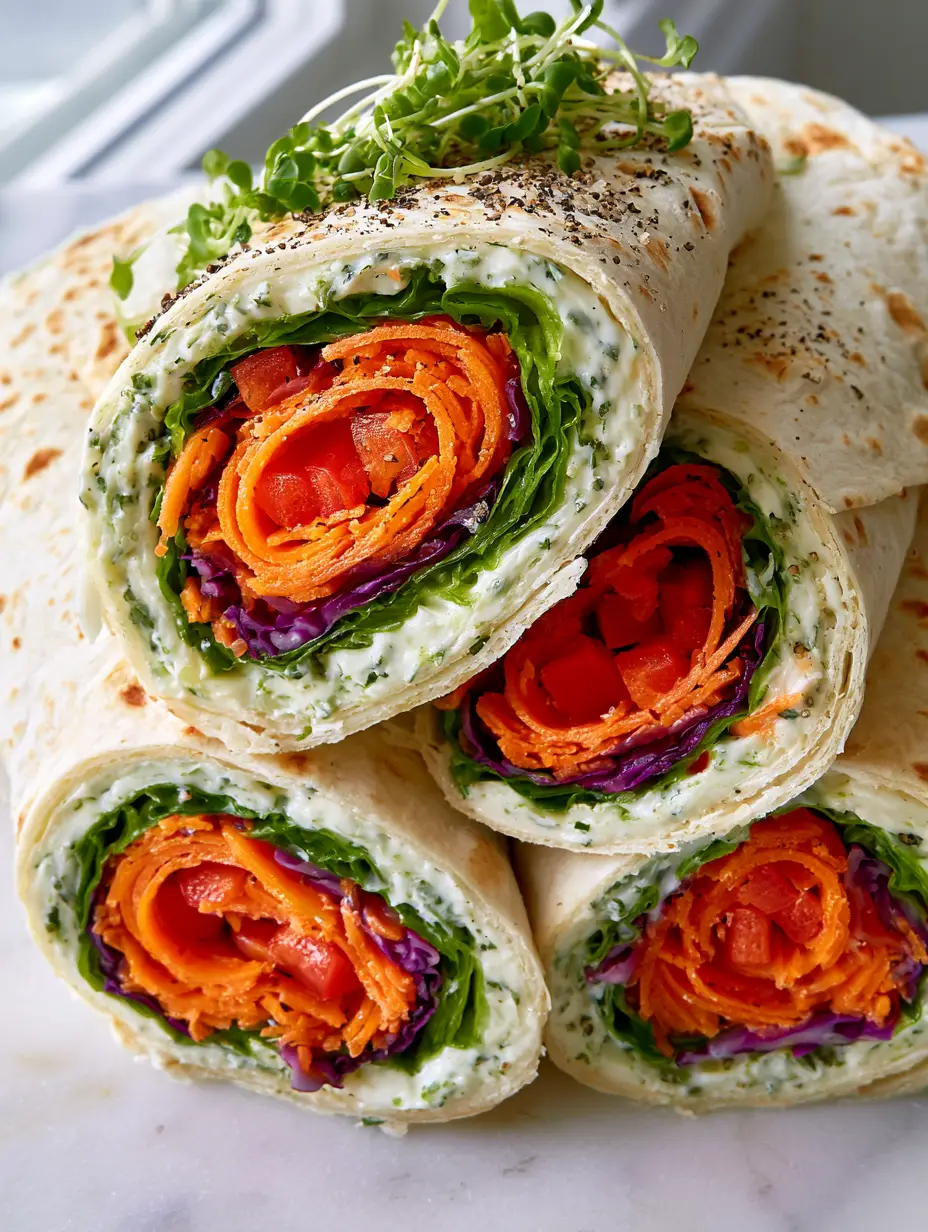
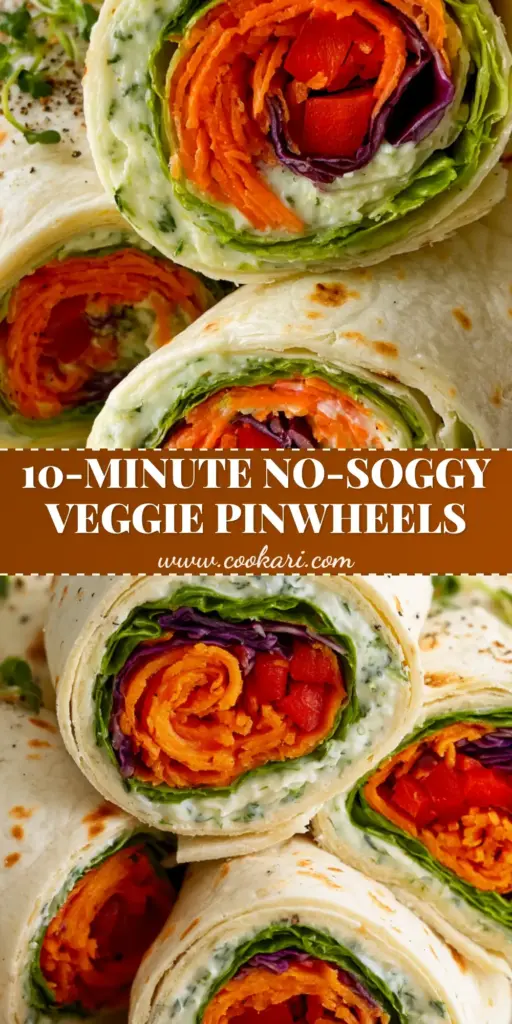
The visual appeal of these Vegetable Tortilla Roll Ups is undeniable, featuring a literal rainbow of garden-fresh produce tightly spiraled within a soft, flour tortilla. Each cross-section reveals a meticulous arrangement of orange, red, and purple hues, all held together by a rich, herb-flecked cream cheese. Whether you are prepping a healthy bento box lunch or hosting a summer gathering, these pinwheels are guaranteed to be the centerpiece of the table.
Inspired by the “rainbow food” movement, this recipe prioritizes the forensic details: the tiny toasted golden freckles on the tortilla, the sharp bite of cracked black pepper, and the delicate texture of fresh micro-greens. It’s a sophisticated take on a classic that elevates the humble wrap into a gourmet experience.
The Culinary Allure of Rainbow Garden Pinwheels
- Structural Integrity: A crisp green leaf lettuce lining acts as a functional moisture barrier between the juicy vegetables and the soft tortilla.
- Textural Harmony: Experience the contrast between the velvety herb-infused cream cheese and the snap of julienned raw carrots.
- Vibrant Phytochemicals: Each color represents a different set of nutrients, from the beta-carotene in carrots to the anthocyanins in purple cabbage.
- Gourmet Aesthetics: Topped with micro-greens and cracked black pepper, these roll-ups look like they stepped out of a high-end food magazine.
Essential Components for the Perfect Vegetable Tortilla Roll Ups
Creating the perfect Vegetable Tortilla Roll Ups requires more than just rolling vegetables in bread; it requires a balance of flavors and a strategic layering of ingredients. Below are the foundational elements you will need to achieve the professional result seen in our visual guides.
Soft Flour Tortillas: You’ll want 10-inch (25cm) tortillas that are pliable and feature those beautiful “toasted golden freckles” from the griddle. These provide the neutral, soft canvas for our vibrant fillings.
Herb-Infused Cream Cheese Spread: Use 1 cup (225g) of full-fat cream cheese softened to room temperature for easy spreading. We infuse this with 2 tbsp (8g) of fresh chives and 1 tbsp (4g) of fresh dill to create a savory, aromatic base.
Green Leaf Lettuce: Choose the brightest, freshest leaves available. This isn’t just for crunch; it’s a culinary tool used to prevent the moisture from the peppers and cabbage from migrating into the tortilla.
Julienned Raw Carrots: Use 1 cup (125g) of carrots cut into matchsticks. The uniform shape is vital for creating that tight, appetizing spiral seen in the cross-section.
Finely Diced Red Bell Peppers: 1 medium (150g) pepper provides a sweet, watery crunch. Dicing them finely ensures they stay tucked inside the roll without creating bulky lumps.
Shredded Purple Cabbage: 1 cup (90g) of thinly sliced cabbage adds a necessary bitterness and a stunning visual pop of deep violet. It provides the “bulk” needed for a tight wrap.
Fresh Scallions & Micro-greens: Sliced scallions add a mild onion bite, while a handful of micro-greens offers a delicate, earthy finish. These are the “finishing touches” that define high-end Vegetable Tortilla Roll Ups.
Seasoning Essentials: 1/2 tsp (3g) of sea salt and 1 tsp (2g) of freshly cracked black pepper. Seasoning the cream cheese and the final garnish is non-negotiable for flavor depth.
Professional Tools for Precision Prep
To achieve the “macro shot” quality of these Vegetable Tortilla Roll Ups, precision is your best friend. A sharp chef’s knife is mandatory for dicing the bell peppers into uniform cubes and slicing the scallions into paper-thin rounds.
A mandoline slicer or a high-quality julienne peeler will make quick work of the carrots and cabbage. Uniformity in your vegetable cuts isn’t just about looks; it allows the tortilla to roll tightly without air pockets, which is the secret to a professional pinwheel.
Finally, ensure you have a sheet of plastic wrap or parchment paper. Chilling the logs before slicing is a mandatory step that allows the cream cheese to firm up, ensuring clean, sharp cuts that reveal the “rainbow” interior perfectly.
The Science of the Perfect Roll: Step-by-Step Instructions
Step 1: Tempering and Seasoning the Base Spread
In a medium mixing bowl, combine your softened cream cheese with the finely chopped chives, dill, and a pinch of garlic powder. Use a rubber spatula to fold the herbs in until the spread is flecked with green and completely smooth.
Spread approximately 3-4 tablespoons (45-60g) of the mixture across the entire surface of the tortilla, leaving only a tiny 1/4 inch (0.5cm) border at the very edge. This cream cheese acts as the “glue” that will hold your Vegetable Tortilla Roll Ups together.
Step 2: Constructing the Moisture Barrier
Lay the green leaf lettuce flat over the cream cheese, pressing down gently so it adheres. The lettuce should cover about 75% of the tortilla, leaving the top edge clear to ensure a proper seal.
By placing the lettuce directly against the cream cheese, you create a hydrophobic layer. This prevents the natural juices from the julienned vegetables from soaking into the flour tortilla, keeping it “soft and pale” rather than soggy.
Step 3: Engineering the Rainbow Spiral
Arrange your vegetables in horizontal rows: first the julienned carrots, then the diced red bell peppers, followed by the shredded purple cabbage and sliced scallions. Do not overstuff; a thin, even layer is the key to a tight cluster.
Sprinkle a generous amount of cracked black pepper over the vegetables. This adds a subtle heat that cuts through the richness of the cream cheese, a sensory cue that elevates the flavor profile of the Vegetable Tortilla Roll Ups.
Step 4: The Tension Roll and Chill
Starting from the edge closest to you, fold the tortilla over the vegetables and tuck it in tightly. Continue rolling with constant even pressure, ensuring the “spirals” are packed closely together.
Wrap each log tightly in plastic wrap, twisting the ends like a candy wrapper. Place the logs in the refrigerator for at least 60 minutes. This “resting period” is critical; it allows the moisture to equalize and the cream cheese to set into a firm matrix.
Step 5: The Master Cut and Garnish
Using a very sharp serrated knife, trim the uneven ends of the log. Slice the remaining log into 1-inch (2.5cm) thick pinwheels. Wipe the knife blade with a damp cloth between every slice to ensure the cream cheese doesn’t smudge the vibrant vegetable colors.
Arrange the pinwheels in a tight, appetizing cluster on a light marble surface. Scatter the fresh micro-greens and an extra dusting of cracked black pepper over the top to match the “bright and airy” aesthetic of professional food blog photography.
Expert Tips for Visual and Flavor Success
- Room Temperature Tortillas: Never roll a cold tortilla. Microwaving them for 10 seconds makes them pliable and prevents the “toasted golden freckles” from cracking.
- The “Wipe” Method: For the cleanest cross-sections, a clean knife is essential. If the cream cheese smears, the “vibrant rainbow” effect is lost.
- Herb Variations: While chives and dill are classic, adding a hint of lemon zest to the cream cheese can brighten the entire flavor profile of your Vegetable Tortilla Roll Ups.
- Pat Dry: Always pat your washed lettuce and peppers dry with a paper towel. Excess external water is the enemy of a long-lasting pinwheel.
Storage and Preparation in Advance
Vegetable Tortilla Roll Ups are a fantastic “make-ahead” option. You can prepare the logs up to 24 hours in advance and keep them wrapped in the refrigerator. In fact, they are often easier to slice after a long chill.
Once sliced, these pinwheels should be consumed within 4-6 hours for peak texture. If you are packing them for a healthy bento box lunch, place a small piece of parchment paper between the layers to prevent them from sticking together.
We do not recommend freezing this recipe. The high water content in the cabbage and bell peppers will cause the cell walls to collapse upon thawing, resulting in a watery mess that ruins the structural integrity of the roll.
Perfect Pairings for a Vibrant Spread
These Vegetable Tortilla Roll Ups are incredibly versatile. For a complete garden-themed luncheon, consider serving them alongside a cucumber tomato avocado salad for a double dose of fresh produce.
If you’re hosting a backyard party, they pair beautifully with other cold sides like an Amish macaroni salad or a refreshing Mediterranean pasta salad. The creaminess of the roll-ups acts as a perfect foil to the vinegary notes of a pasta salad.
For a sweet finish to your meal, a bowl of creamy grape salad or a light strawberry daiquiri rounds out the summer vibe perfectly.
Frequently Asked Questions
Absolutely. If adding deli meats, place them directly on top of the lettuce barrier before adding the julienned vegetables to maintain the rainbow spiral appearance.
Yes! These are best when chilled. You can keep the wrapped logs in the fridge for up to 24 hours before slicing for the cleanest presentation.
Chill the rolls for at least an hour, use a very sharp serrated knife, and most importantly, wipe the blade clean with a damp cloth after every single cut.
The secret is creating a moisture barrier. Layering a large, dry piece of green leaf lettuce between the cream cheese and the julienned vegetables prevents the vegetable juices from soaking into the tortilla.
Standard 10-inch flour tortillas are best because they are pliable. For the best look, choose ones with small golden freckles and ensure they are at room temperature before rolling.
The Ultimate Rainbow Vegetable Tortilla Roll Ups Recipe
Vegetable Tortilla Roll Ups: The Ultimate Vibrant Rainbow Pinwheels
Ingredients
Equipment
Method
- Mix softened cream cheese with chives and dill until smooth. Season with a pinch of salt.
- Spread cream cheese onto tortillas. Lay lettuce over the spread to create a moisture barrier.
- Arrange carrots, peppers, cabbage, and scallions in tight rows. Sprinkle with cracked pepper.
- Roll the tortilla tightly, wrap in plastic, and refrigerate for at least 1 hour to set.
- Slice into 1-inch pinwheels using a sharp serrated knife, wiping the blade between cuts.
Notes
Use green leaf lettuce as a barrier to prevent sogginess.
Closing & Call to Action
These Vegetable Tortilla Roll Ups prove that healthy eating can be a feast for the eyes as much as the palate. By following our “moisture barrier” technique and focusing on precision cuts, you can create a restaurant-quality appetizer in your own kitchen. The combination of herb-flecked cream cheese and crisp, julienned vegetables offers a refreshing bite that is perfect for any occasion.
Did you make these rainbow pinwheels? We would love to see your results! Tag us in your photos and share your favorite vegetable swaps in the comments below. Don’t forget to follow us and save this recipe to your boards on Pinterest for your next meal prep session!
For more vibrant meal ideas, check out our guide on summer vegetable side dishes to keep the garden-fresh momentum going all season long!
Author’s Note: The secret to the “pale cream” tortilla color is using high-quality flour tortillas and avoiding over-toasting. Natural side-lighting will help you capture that “fresh morning atmosphere” if you’re photographing your creation!