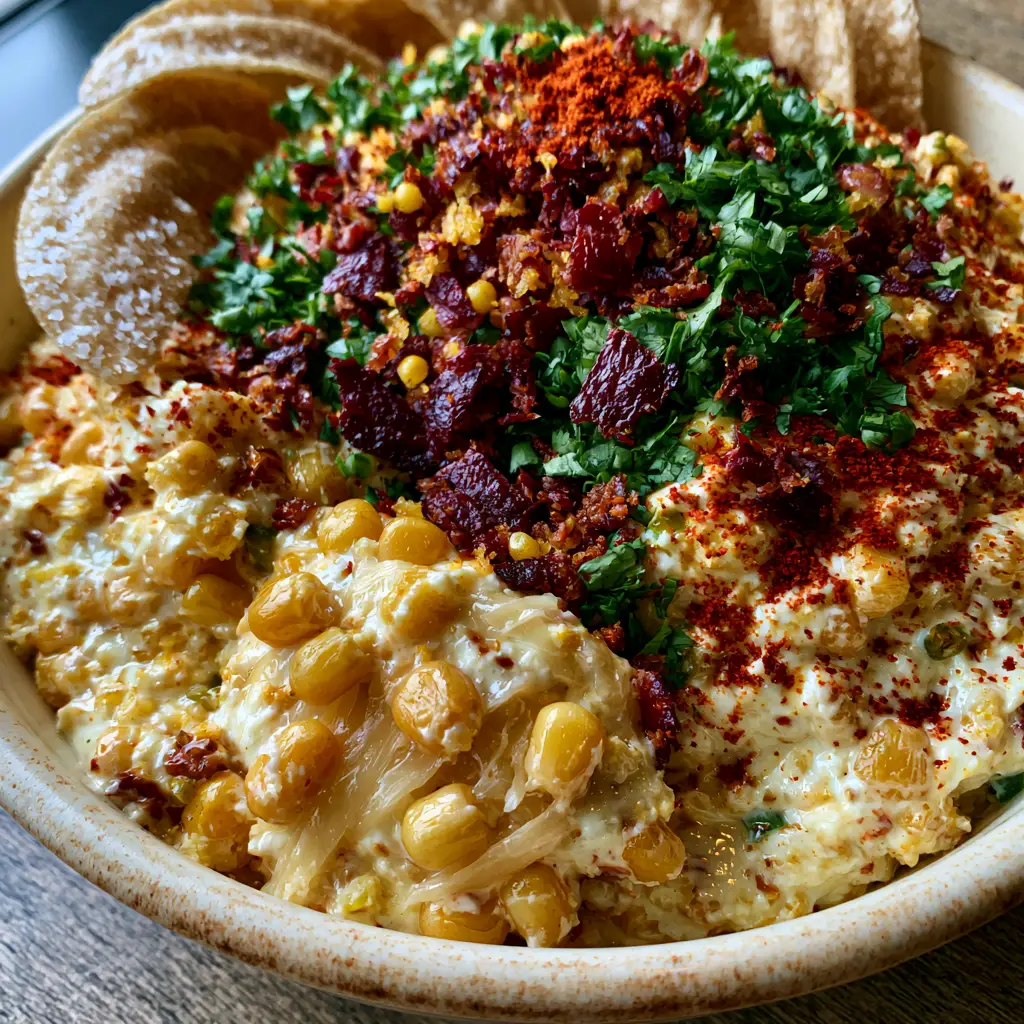
When it comes to crowd-pleasing party snacks, few things rival the sheer indulgence of a perfectly chilled corn dip. This isn’t just a simple mixture; it is a meticulously layered experience of textures and flavors. Imagine a rustic, cream-colored ceramic bowl overflowing with a base so glossy and thick it clings to every chip. Every bite delivers the snap of plump sweet corn kernels, the sharp tang of marble jack cheese, and the smoky crunch of dark-red bacon bits.
The visual appeal of this corn dip is a direct reflection of its gourmet flavor profile. Bathed in soft, natural window light, the vibrant colors of bright green cilantro and the deep red of a smoked paprika dusting make this dish the centerpiece of any wooden table spread. Whether you are hosting a summer backyard bash or looking for a comforting game-day snack, this recipe hits every sensory note from the first scoop to the last salty crunch.
As an elite recipe developer, I have engineered this specific version to balance the richness of a sour cream and mayo base with the acidity of mild green chiles. The result is a corn dip that is structurally sound enough to hold up heavy corn chips while remaining light and refreshing enough for second (and third) helpings. Let’s dive into the science of building the perfect cold dip.
Why This Loaded Cold Appetizer Is the Ultimate Crowd-Pleaser
- Unrivaled Texture: The contrast between the soft, plump sweet corn and the ultra-crispy, dark-browned bacon crumbles provides a professional-grade mouthfeel.
- Visual Masterpiece: The marbled cheddar cheese and vibrant smoked paprika dusting create a high-contrast look that is as beautiful as it is delicious.
- Perfectly Balanced Base: Using a 50/50 blend of thick sour cream and high-quality mayonnaise ensures a glossy, stable consistency that doesn’t separate.
- Make-Ahead Friendly: This corn dip actually tastes better after the flavors meld in the refrigerator, making it the stress-free solution for entertaining.
The Cold Corn Dip Component Checklist: Ingredients & Substitutions
Plump Sweet Corn Kernels: 3 cups (450g). You can use fresh off-the-cob, frozen (thawed), or canned (drained). The key is ensuring they are dry so the base remains thick and glossy.
Thick Sour Cream: 1 cup (240g). This provides the essential lactic tang and the “heaviness” required for a cold dip. Use full-fat for the best structural integrity.
High-Quality Mayonnaise: 1 cup (220g). Mayo acts as the emulsifier, giving the corn dip its signature glossy sheen and rich mouthfeel seen in professional food photography.
Shredded Marbled Cheddar Cheese: 1.5 cups (170g). The blend of white and orange cheddar provides a beautiful visual contrast and a balanced, sharp-to-creamy flavor profile.
Diced Mild Green Chiles: 1 can (4oz / 113g). These add a subtle earthy undertone without overpowering the sweetness of the corn or the smokiness of the bacon.
Crispy Browned Bacon Crumbles: 6 slices (approx. 150g raw). We render these until dark red and brittle to ensure they provide a necessary crunch against the creamy base.
Freshly Chopped Green Cilantro: 1/4 cup (10g). The bright herbaceous notes cut through the richness of the dairy and add a pop of “life” to the bowl.
Smoked Paprika: 1 tsp (2g). This is the secret to that “vibrant red” dusting that adds a hint of wood-fired flavor to a cold dish.
Sliced Scallions: 3 large stalks (approx. 30g). Use both the white and green parts for a mild onion bite that lingers pleasantly.
Invisible Essentials: 1/2 tsp (3g) fine sea salt and 1/4 tsp (1g) cracked black pepper. These are scientifically required to bridge the flavors between the sweet corn and the savory bacon.
Essential Tools for the Perfect Cold Dip Presentation
To achieve the look of a professional food blog, your equipment matters as much as your ingredients. You will need a heavy-bottomed skillet to render the bacon to that specific dark-red, crispy state without burning the edges. A sharp chef’s knife is non-negotiable for achieving the “tiny diced” look of the green chiles and the clean slices of the scallions.
For mixing, use a large glass or stainless steel bowl to ensure you can fold the ingredients together without crushing the corn kernels. Finally, for serving, find a rustic cream-colored ceramic bowl. The neutral tone of the ceramic allows the colors of the corn dip—the yellow corn, orange cheese, and red paprika—to truly pop under natural lighting.

Step-by-Step Culinary Breakdown to Build the Perfect Dip
Rendering the Bacon for Maximum Crunch
Start by dicing your raw bacon into small, uniform pieces. Place them in a cold skillet over medium heat. By starting cold, you allow the fat to render slowly, which results in that sought-after dark-red, ultra-crispy texture. Stir occasionally for about 8-10 minutes. Once they reach a deep mahogany color, remove them with a slotted spoon and drain on paper towels to ensure no excess grease softens your corn dip later.
Preparing the Creamy Glossy Base
In a large mixing bowl, whisk together the 1 cup (240g) of sour cream and 1 cup (220g) of mayonnaise until perfectly smooth. This is the stage where you add your “invisible” seasonings—the salt, pepper, and a pinch of garlic powder if you desire. Whisking the base first ensures that the flavors are evenly distributed before the bulky ingredients like corn and cheese are added, preventing over-mixing of the delicate kernels.
Folding in the Textures and Flavors
Add the 3 cups (450g) of corn kernels, 1.5 cups (170g) of shredded marbled cheddar, and the drained diced green chiles to the creamy base. Use a silicone spatula to gently fold the ingredients. You want every kernel of corn to be “embedded” in the glossy base without being smashed. This technique preserves the “plump” appearance described in our visual blueprint.
The Art of the Garnish
Transfer the mixture to your rustic ceramic serving bowl. This is where the corn dip becomes a work of art. Do not mix the garnish in! Instead, heavily garnish the top with your cooled bacon crumbles. Sprinkle the bright green chopped cilantro and sliced scallions evenly across the surface. Finally, take a small sieve and apply a light, even dusting of the vibrant red smoked paprika. This creates the deep textures and appetizing highlights that make the dish irresistible.
Pro Secrets for the Best Corn Dip Success
- Dry the Corn: If using canned or thawed frozen corn, pat it dry with paper towels. Excess moisture will thin out the mayo and sour cream, destroying the “thick and glossy” texture.
- Chill Before Serving: While you can eat this immediately, letting the corn dip sit in the fridge for at least one hour allows the chiles and scallions to infuse the creamy base.
- The Chip Choice: Always serve with thick, salty, curved corn chips. Thin chips will snap under the weight of this loaded dip. The “curve” of the chip acts as a shovel for the plump kernels.
- Cheese Matters: Hand-shredding your marbled cheddar from a block results in thicker, more rustic shreds than the thin “matchsticks” found in pre-shredded bags.
Storing and Managing Your Leftovers
This corn dip is a cold-process recipe, meaning it stores exceptionally well. Place any leftovers in an airtight container and keep them refrigerated. For the best quality, consume within 3 to 4 days. Note that the bacon will lose its “dark-red crispy” texture over time as it absorbs moisture from the cream base, so if you are making this a day in advance, consider keeping the bacon in a separate container and garnishing just before serving.
We do not recommend freezing this recipe. The emulsion of mayonnaise and sour cream will likely break upon thawing, resulting in a grainy texture that lacks the glossy, professional finish we’ve worked so hard to achieve.
The Perfect Table Spread: What to Serve With This Dip
To create a full spread for your guests, consider pairing this corn dip with other complementary textures. It fits perfectly alongside a variety of creamy dip recipes that offer different flavor profiles, such as a spicy buffalo chicken or a cooling tzatziki. If you enjoy the flavors of the Southwest, you might also want to try a baked elote dip for a warm alternative.
For a lighter side, this dip pairs beautifully with a fresh corn salad or a zesty spicy corn slaw. If you’re hosting a full lunch, serving this as an appetizer before a chicken bacon ranch pasta salad creates a cohesive, bacon-themed menu that guests will absolutely love. The salty crunch of the corn chips also makes it a great companion to a watermelon feta salad for that perfect sweet-and-salty balance.
Frequently Asked Questions About Homemade Corn Dip
Absolutely. Making it ahead allows the flavors to meld. For best results, add the crispy bacon and fresh cilantro garnishes right before serving to maintain their texture.
Yes, canned corn works perfectly. Just ensure you drain it thoroughly and pat the kernels dry with a paper towel to keep the dip thick and glossy.
Because it contains sour cream and mayonnaise, it should not sit out for more than 2 hours. Keep it chilled in the fridge until just before serving.
This recipe uses mild green chiles, which provide flavor depth without significant heat. To make it spicy, you can add diced fresh jalapeños or a dash of cayenne pepper.
Thick, curved corn chips (like Fritos Scoops) are best because they are sturdy enough to hold the heavy, loaded dip without breaking.
The Ultimate Loaded Cold Corn Dip Recipe
Corn Dip: The Ultimate Creamy Cold Appetizer with Crispy Bacon and Marbled Cheddar
Ingredients
Equipment
Method
- Place diced bacon in a cold skillet over medium heat. Fry until the bacon is dark-red and very crispy (about 8-10 minutes). Drain on paper towels.
- In a large bowl, whisk together the sour cream and mayonnaise until the mixture is thick, glossy, and smooth.
- Fold in the corn, marbled cheddar, and green chiles until everything is evenly coated in the creamy base.
- Transfer to a serving bowl. Top with the crispy bacon, chopped cilantro, sliced scallions, and a dusting of smoked paprika. Serve with thick corn chips.
Notes
For the best flavor, allow the dip to chill in the refrigerator for at least one hour before serving.
Bring the Flavor Home!
There you have it—the most visually stunning and culinarily sound corn dip you will ever make. By focusing on high-quality ingredients and the science of texture, you’ve created a dish that looks like it stepped right out of a professional photo shoot. The combination of the smoky paprika, the sharp marbled cheddar, and those plump kernels is truly a game-changer.
If you loved this recipe, please leave a comment below and tell us how it turned out! Don’t forget to sign up for our newsletter for more elite recipe blueprints and follow us on Pinterest to save this to your favorite appetizer boards. Happy dipping!